Showing posts with label iTunes. Show all posts

Change iTunes Language From/To English

Posted by on 9/22/2016

This post shows you how to change iTunes language from or back to English. iTunes for Windows or Mac uses the default OS language for its user-interface. This happens at the time of installing it on Laptop/PC. But the iTunes app ships with built-in language a pack that supports almost all popular languages. It means you can change language on iTunes at any given time without downloading country specific version.

The language setting will make the entire iTunes interface (like menus, buttons, commands, subtitle etc) to be displayed in your preferred language. In case you don't know, here's how to edit iTunes language.

How to Change iTunes Language?

Please follow the below steps to modify the language setting in iTunes on your Windows/Mac PC.
change-itunes-language-from-back-to-english
  1. On Windows OS, launch iTunes and select 'Edit' and then 'Preferences'. Alternatively use Ctrl + Comma shortcut on Windows 7/8/10 machines. For Mac, go to iTunes menu and choose 'Preferences' or hit Cmd + Comma hotkey to access preferences.
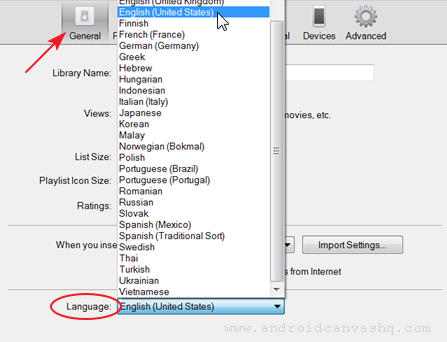
  2. Under 'General' tab locate 'Language' drop down. The language selected in this drop down would be used as user interface language for iTunes. iTunes ships with around thirty five different languages and several of its variants. Now click on the dropdown and choose the language you want and hit 'OK' to save the changes.
  3. Once you have changed iTunes language you need to restart the application for the changes to take effect. So exit iTunes (File » Exit) and wait for a few seconds before restarting it.
  4. After restart, all items on iTunes UI like menus, buttons, commands and others will be shown in the language you have chosen.

Related: Manage, Cancel Magazine Subscription from iTunes/iPhone/iPad

Likewise you can change the iTunes language from or back to english to some other languages. Please keep in mind, this language setting will affect every part of the UI except for the store. To change the store language you have to go to a different country's store like you do for Amazon.com website.

iTunes/iPhone/iPad: Manage, Cancel Magazine Subscription

Posted by on 9/19/2016

This post demonstrates about how to manage and cancel magazine subscription from iTunes, iPhone or iPad devices. On iTunes you can easily subscribe for Newsstand and other online services on monthly or yearly basis. These services will be renewed automatically by default at the end of the period.

But at times you may want to cancel some unwanted magazine subscriptions and control these recurring charges. Apple gives you option to do this. In case you don't know where to look for, here's how to manage and cancel magazine subscriptions from iTunes, iPhone, iPad or iPod touch.

Manage/Cancel Magazine Subscription on Windows/Mac:

manage-cancel-magazine-subscription-from-itunes-iphone-ipad
  1. Launch iTunes and go to 'Store' » 'View Account'. It will ask for your apple password. Enter your credentials and login to your account.
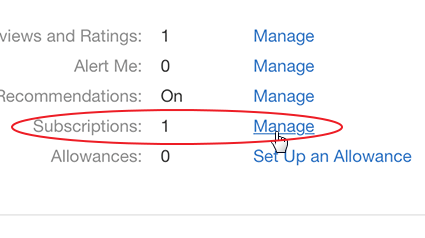
  2. Locate your account settings and scroll down to the bottom of the page. Then click on 'Manage' link next to 'Subscriptions'. This is where you can manage, cancel, or renew all of your magazine subscriptions.
  3. On the next screen you will see a list containing all of your active and inactive subscriptions associated with your Apple ID (email address).
  4. Inactive subscriptions will no longer be available in your account and shows the word 'Expired' next to them. And all of the active services (subscriptions) will display next renewal date besides them.
  5. If you want to manage the subscription's renewal period then click on 'Edit' next to magazine name. Go to 'Renewal Options' and choose monthly or early renewal as you wish.
  6. To cancel your recurring subscription, click on the 'Edit' link right next to the service (magazine name). And locate 'Automatic Renewal' and choose 'Off'. Click on 'Done' to save your changes.

That makes the subscription to expire the next time it goes for renewal and kept in inactive state.

Manage/Cancel Magazine Subscription from iPhone/iPad:

Likewise you also manage & cancel magazine subscriptions from your iPhone or iPad devices.

  1. Open iTunes Store App and scroll to the bottom of the screen and tap on Apple ID button (email address).
  2. Enter your itunes password when asked and once you are logged in, navigate to 'Subscriptions' section and tap on 'Manage'.
  3. On the next screen, tap on the subscription you want to cancel, and turn OFF the toggle switch next to 'Automatic Renewal'. Confirm your choice and tap again on 'Done' button for the changes to take effect.

Likewise you can easily manage or cancel magazine subscription from iTunes or iOS devices.

Related: Delete Partially Downloaded iTunes Files/Movies/Apps

Delete Partially Downloaded iTunes Files/Movies/Apps

Posted by on 9/15/2016

This post will show you how to delete partially downloaded iTunes files/movies/tv episodes/apps. iTunes temporarily stores files that are being downloaded in 'iTunes Media' folder. Once downloads are over, they will be moved to a permanent location in your hard drive.

If for any reason the iTunes downloads are interrupted, the partially downloaded TV shows/movie rentals/files won't get deleted. They will be stored in your hard disk even if you remove them from iTunes download queue. You have to delete them manually and here's how to do it on windows 7/8/10.

How to Delete Partially Downloaded iTunes Files?

delete-partially-downloaded-itunes-movies-tv-shows-files
  • To delete partially downloaded files, first of all close iTunes and open windows explorer (use Win+E shortcut). This will release the lock on partial downloads so that you can delete them.
  • On the left hand side, double click on 'Music' menu under 'Libraries'. Then on right side pane, navigate to 'iTunes' » 'iTunes Media' » 'Downloads'. This is where all the partially downloaded files are kept. Once the download is completed iTunes move the media files from here.
  • To get rid of all the partial downloads, select all files (use Ctrl+A) and press 'Delete' key. Alternatively scroll mouse to select all files, right click and choose 'Delete' on context menu.
  • On Windows machine, deleting the files will move them to 'Recycle bin'. It's up to you to empty recycle bin (which deletes file forever) or restore the deleted files.

Read: How to Stop iTunes from Automatically Downloading Movies / Songs

So likewise you could delete partially downloaded iTunes movie rentals, apps or any other files on Windows 7/8/10 machine.

Stop iTunes from Automatically Downloading Purchases/Movie/Songs

Posted by on 9/12/2016

This article will show you how to stop iTunes from automatically downloading songs, movies, apps or TV shows. Does iTunes keeps downloading TV shows or movies automatically even if you don't want it to do? You can put a stop to this annoying behavior.

Many don't bother to customize iTunes settings after installing. So regardless of what you want or don't want iTunes automatically checks for available downloads and start downloading them as soon as you login to the store. You can prevent this automatic downloads and here's how to do it.

How to Stop iTunes from Automatically Downloading?

stop-itunes-from-automatically-downloading-movies-tv-shows
  1. If you are on Windows then launch iTunes and go to 'Preferences' (or use Ctrl+, hotkey). On Mac machine, open iTunes » click on the 'Top-left Menu' and choose 'Preferences'. Alternatively use keyboard shortcut Cmd+, (command + comma)
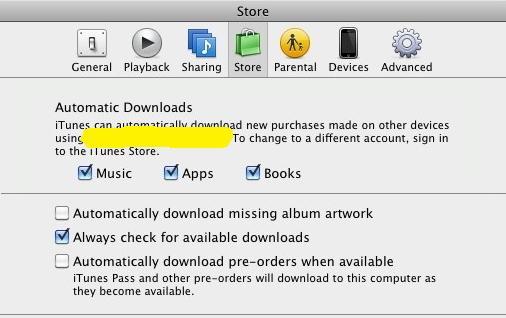
  2. A pop-up window will appear; you switch over to 'Store' preferences and look for 'Automatic Downloads' section. Under that you'll see a list of checkboxes for different media like Music, Movies, TV Shows, Apps & Books. Uncheck all of them to stop automatic downloads of that corresponding file type.
  3. Also make sure to uncheck 'Always check for available downloads' checkbox and hit 'OK' to save your preferences.
  4. That will stop iTunes from automatically downloading purchased movies, songs, eBooks or anything of that sort when you login to store. It will even prevent iTunes from checking for new downloads too.
  5. To manually check for newly available downloads, go to 'Store' and click on 'Check for available downloads'. You can either accept or pause downloads and by this way you have more control over iTunes downloads.

Related Read: How to Stop iTunes from Asking for Password Everytime

With these simple steps you can easily prevent iTunes automatic downloads.

How to Stop iTunes from Asking for Password Everytime

Posted by on 9/09/2016

This tutorial will show you how to stop itunes from asking for password everytime. Are you annoyed of the way itunes prompt for your password over and over? To prevent accidental/unauthorized purchases, itunes asks for password every time you buy something from the store.

Unfortunately this setting is made default and you have to explicitly stop it from asking. The good thing is the changes you make from one machine don't affect other devices so you can do this only from the machine you trust. Here's how to prevent iTunes asking for password for every purchase.

stop-itunes-asking-for-password-over-and-over

How to Stop iTunes from Asking for Password Everytime?

  1. Open iTunes and go to 'Edit' » 'Preferences' on Windows 7, 8 or 10 machine. For Mac OS, select 'iTunes' » 'Preferences'.
  2. Then switch over to 'Store' tab on Preferences window.
  3. You'll see two dropdowns to set password preferences for your purchases. One for all your new purchases and another for free download.
  4. The 'Purchases' drop down provides 3 options for you to set. One is 'Always Require', the default option, the second one 'Require After 15 Minutes' which makes itunes to prompt for password if you haven't made purchase for 15 minutes. And the final one is 'Never Require' which stops iTunes from asking password for every purchase.
  5. Choose 'Never Require' option for 'Purchases' drop down.
  6. Again to prevent iTunes prompt for password for free downloads as well, select 'Never Require' under 'Free Downloads'.

That should stop iTunes from asking for password every time you make purchase or any free downloads. It just simply asks for your confirmation and show a message, 'Are you sure you want to purchase' whenever you buy anything from the store.

Also Read: How to minimize iTunes to Windows System Tray?

Minimize iTunes to System Tray in Windows 7/8/10

Posted by on 9/05/2016

This article will show you how to minimize itunes to system tray in windows 7/8/10. When you minimize iTunes for PC on windows system, it will minimize itself to taskbar and not system tray. But you can make iTunes to minimize to windows tray.

By this way you can run the app on the background and keep it out of your way. Fortunately iTunes has an option for doing this. In case you don't know, here's how to minimize iTunes to system tray in windows laptop or desktop.

Minimize iTunes to System Tray in Windows 7/8/10:

minimize-itunes-to-system-tray-windows-7-8-10
  1. Launch iTunes and go to the top menu, then click on 'Edit' and choose 'Preferences'.
  2. Once you are in Preferences window, switch to 'Advanced' tab.
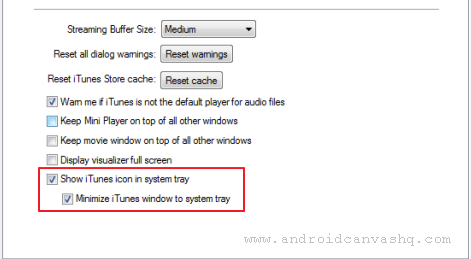
  3. Now tick the checkbox 'Show iTunes icon in system tray' and then on 'Minimize iTunes window to system tray' and hit enter. (These options are placed at the bottom of the window, so look for them at the end)
  4. That will do! Next time when you click on minimize button in iTunes, it will automatically minimize to system tray rather than the taskbar.
  5. If you can't see iTunes icon on the tray don't panic. Sometimes icons may be hidden on windows system tray if there are too many. Just click on the left arrow («) button and the tray will expand to show all hidden icons.

Minimizing iTunes to system tray is very helpful if you are used to play music on iTunes on your laptop/pc. By this way you get to access it whenever you want and keep it out of your way if you don't.