Showing posts with label Windows 10. Show all posts

How to Change Ringtone in Windows 10 Mobile

Posted by on 11/15/2016

Do you have a Windows 10 mobile and wonder how to change ringtone in Windows 10 mobile? Windows 10 Mobile comes preloaded with some default ringtones and you can change your phone's ringtone to any one of them easily. But for new windows mobile users, finding their way through customizations would be a challenge with the tricky interface.

Windows 10 phones include so many unique features and if you feel let down after buying a windows mobile then don't worry. Once you get accustomed to the interface you will be really happy to have such rich features in your Smartphone. So here let's see how to change ringtone in Windows 10 mobile.

change-ringtone-in-windows-10-phone

To Change ringtone in Windows 10 mobile:

windows-10-mobile-change-default-ringtone
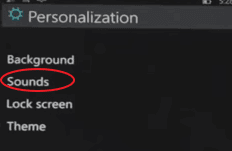
  1. Navigate to 'Settings' » 'Personalization' » 'Sounds' option.
  2. Look for 'Ringtone' setting on the screen and tap under it.
  3. Scroll down the list and select any of the Windows 10 pre-loaded ringtones you like.
  4. Done! Now you have successfully changed Windows 10 phone ringtone.

But the above method has some limitation. It not much of use if you'd like to set your favorite song as ringtone in Windows 10 mobiles. Surely there are some workarounds and here's how to do it.

How to Set Custom Ringtones in Windows 10 Phone?

Please keep in mind, this method works only from your PC. So don't try it from your mobile itself.

  1. Plug-in your windows mobile to Laptop/PC via USB cable.
  2. If you haven't installed the mobile drivers already in the PC, then allow little time for the system to identify and install drivers of your windows mobile.
  3. Once everything in place, open 'My Computer' (or 'This PC' on Windows 10 PC) and find your Windows 10 phone icon.
  4. Double-click to open it in file explorer and go to 'Ringtone' folder where all your mobile ringtones were stored.
  5. Then copy-paste the song file you want to use as ringtone to this folder. Please make sure to use only '.mp3' format for the phone to recognize it as ringtone.

Now you can set this song as your custom ringtone in the same way you have changed the ringtone in windows phone.

The next windows 10 tips is for folks who don't have PC :)

set-custom-ringtone-in-windows-10-mobile-ringtone-maker

If you don't own a PC or Laptop to change Windows 10 mobile ringtone, then don't worry. You can always use 'Ringtone Maker APP' that comes pre-installed with windows mobiles. If for any reason you don't have it installed you can always go to 'Windows phone store' and download and install the app.

  1. Launch Ringtone Maker app on your windows phone and choose any of the music file you like.
  2. Now move the edge pointers and snip the bit you want to use as ringtone.
  3. Then save the file and set it as custom ringtone.

Related: How to Get Help with File Explorer in Windows 10

Related: How to Change Screen Resolution in Windows 10

Using the above ways you can easily change ringtone in Windows 10 mobile. Though I have given the tips for Windows 10 phone, they work on earlier windows versions too. So you can change ringtones on windows 8.1 mobiles in the similar fashion.

How to Change Screen Resolution in Windows 10

Posted by on 11/08/2016

Are the desktop icons in your Windows 10 pc/laptop looks zoomed or stretched and you want to fix Windows 10 screen resolution problem? Then here's how to change screen resolution in Windows 10. Generally screen resolution is responsible for display clarity and it depends upon the monitor or display screen size of the device.

Installing Windows OS and Graphics drivers automatically set the screen resolution to the recommended dimension. But high graphics softwares or games may reset screen resolution or force you to choose something different.

If you are a new Windows 10 user, then finding the screen resolution settings is bit difficult. As Microsoft has moved most of the settings to its new Settings App and renamed the option from 'Screen Resolution' to 'Display Settings'. Just follow the below given method to change Windows 10 screen resolution via 'Display Settings'.

Change Screen Resolution in Windows 10:

  1. Before adjusting the screen resolution close-off or at-the-least minimize all other opened windows. Just use keyboard shortcut Win logo + D to minimize all windows.
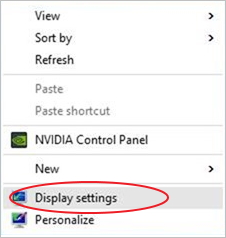
  2. Now right-click mouse anywhere on Desktop and choose 'Display settings' from the context-menu.
  3. how-to-change-screen-resolution-in-windows-10
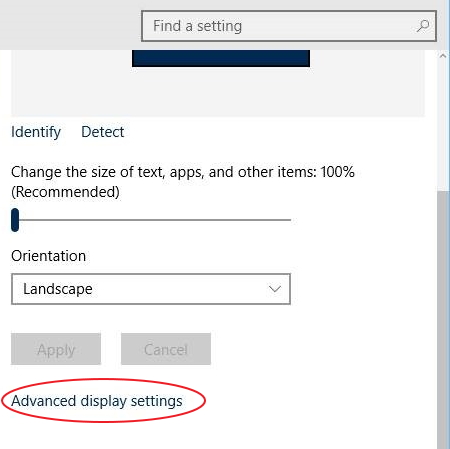
  4. This will open 'Display' settings on 'Settings' app. Now move on to the right side pane and click on 'Advanced display settings' link.
  5. windows-10-screen-resolution-problem-advanced-settings
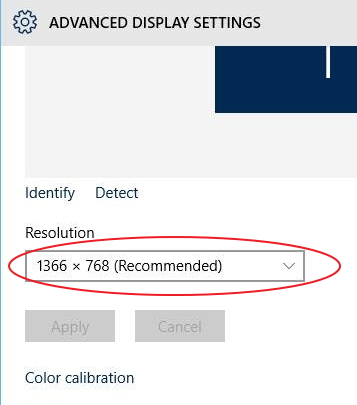
  6. Locate the dropdown box under 'Resolution' and click on it to view all the supported screen resolutions for your machine. Choose any one of them and click 'Apply'. Unless you have to, never choose anything other than the recommended size.
  7. windows-10-screen-resolution-problem-fix
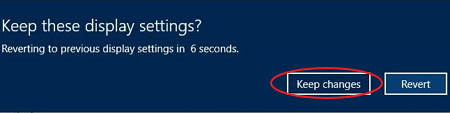
  8. Next you will be greeted with a popup showing for fifteen-seconds letting you confirm the new screen resolution or revert back to the old one. If the new setting fits you okay then click on 'Keep changes' button else click on 'Revert' to roll back the changes you made.
  9. resolution-not-changing-windows-10-fix

On the other hand if your PC includes GPU like NVIDIA or Integrated Intel Graphics, you can change the screen resolution on their settings panel.

To Change Windows 10 Display Resolution for Nvidia,

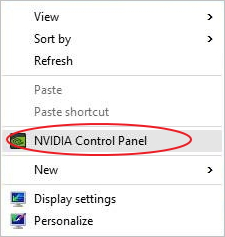
  1. Right-click Mouse anywhere on Desktop and select 'NVIDIA Control Panel' from the context menu.
  2. change-screen-resolution-in-windows-10-nvidia
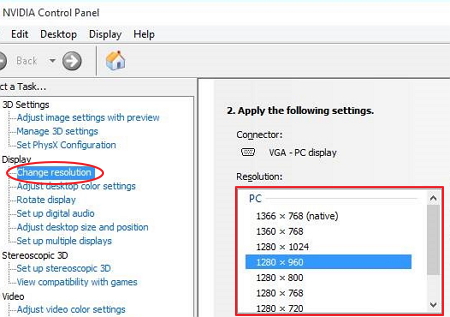
  3. Once inside NVIDIA Control Panel, choose 'Change resolution' under 'Display' settings on the left-pane. It will show all of the supported resolutions on the right-pane. Choose the one you want and 'Apply'.
  4. windows-10-screen-resolution-problem-nvidia-settings

That will do the trick.

To Change Windows 10 Screen Resolution via Intel Graphics,

  1. Right-click on desktop screen and select 'Graphics Properties'.
  2. It will launch the Control Panel for Intel HD Graphics. Now select 'Display', choose your desired resolution from the drop-down and hit 'Apply'.

That should change the screen resolution of Windows 10 PC/Laptop.

Also Read: How to Get Help with File Explorer in Windows 10

Recommended: How to Defer Upgrades in Windows 10

I hope this guide explains clearly how to change screen resolution in Windows 10. Just remember to keep the display resolution to the recommended dimension as this one will be the best size fitting your monitor screen properly.

How to Defer Upgrades in Windows 10

Posted by on 11/03/2016

This post explains about How to Defer Upgrades in Windows 10. Defer Upgrades in Windows 10 is the latest feature introduced by Microsoft to prevent your pc from receiving Windows 10 feature updates. So when you enable this option, new Windows features won't get downloaded or installed for several months but still you'd be able to get security updates.

Deferring upgrades in Windows 10 is very helpful for businesses and individuals who would rather wait for more stable updates and give enough time for testing. Some Windows 10 versions supports this defer upgrade option and we'll see how to defer updates in Windows 10 OS.

Defer Upgrades in Windows 10:

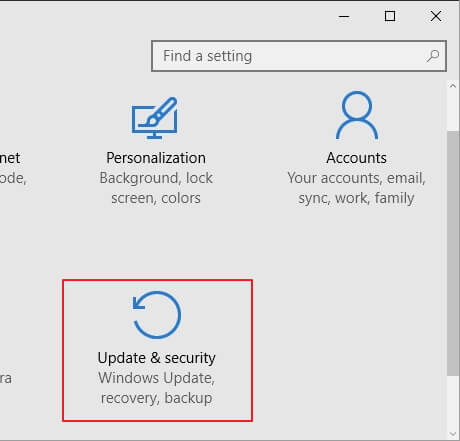
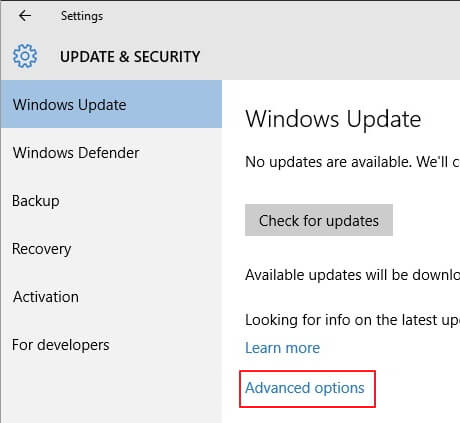
  1. Launch Settings window and choose 'Update & Security'.
  2. how-to-defer-upgrades-windows-10-settings
  3. Under Update & Security, select 'Advanced options' on the right-side pane.
  4. windows-10-update-security-options
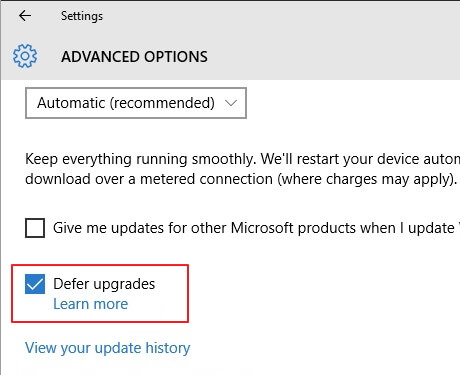
  5. Now tick 'Defer upgrades' checkbox.
  6. defer-upgrades-in-windows-10-pro

Windows 10 Home edition doesn't support 'Defer Upgrades' option. So if you run Home edition on your PC and still want to defer updates, your best bet is to upgrade to Windows 10 Professional, Education, or Enterprise edition.

Here you can check for Microsoft's official words about deferring updates.

Also Read: How to Get Help with File Explorer in Windows 10

So, that explains about how to defer upgrades and updates in Windows 10. If your organization works on critical projects then deferring upgrades is the safest option to ensure no software breaks up in the middle of the time-line. The only downside to this is you won't be able to enjoy windows latest features until after several months.

Get Help with File Explorer in Windows 10 [UPDATED]

Posted by on 10/31/2016

How to get help with File Explorer in Windows 10? Windows 10 gone through major revision and has been released with so many new tools & features. And one such feature of Windows 10 is its new File Explorer. This File Explorer is the replacement for classic Windows Explorer you find older versions.

Along with new user interface, File Explorer includes lot of new functionalities. If you are a Windows 10 user and confused about working with the new tools of File Explorer, this article will guide you to get help with File Explorer in Windows 10 covering all new aspects and possible fixes of Windows 10 File Explorer.

How to Get Help with File Explorer in Windows 10?

File Explorer is the core tool of Windows 10 which is used to view and organize files and folders stored in hard drives. From here you can easily manage all your documents/files and perform operations like rename, copy, move or delete files/folders.

How to Open File Explorer?

To access the features of File Explorer you must first launch the app. There are different ways to open File Explorer in Windows 10 but the easiest way it to use the hotkey. You can use any one of the below given methods to launch it.

get-help-with-file-explorer-in-windows-10
  • Press keyboard shortcut Win Logo + E together to launch File Explorer.
  • Click on Windows Start button and select 'File Explorer'.
  • If you can't find 'File Explorer' listed on Start menu, simply click on the search bar and type 'File Explorer' or just 'explorer' and hit Enter.
  • Alternatively look for 'This PC' icon on your desktop and double-click on it to open File Explorer.

What's New in File Explorer?

File Explorer has got some additional features than the old windows explorer and here are some of the important points to note.

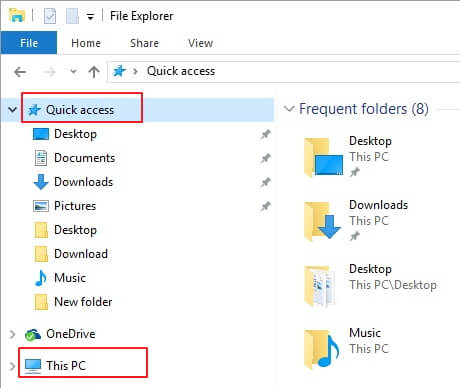
  • Quick Access: There's a new section named 'Quick Access' on the left-side pane on File Explorer which lists the recently accessed files and frequently used folders. Whenever you launch File Explorer it'll open to the list of Quick Access items instead of system storage drives.
  • OneDrive: You can access OneDrive directly from File Explorer. This is the cloud storage application from Microsoft similar to Google Drive. You can upload and sync your files and folders to the cloud from your Windows 10 PC/Laptop and access it from anywhere. To get free access to OneDrive you have to sign up for a Microsoft account and you'll get free storage from their cloud storage.
  • File Sharing: Share Tab is fully integrated with File Explorer. With this you can select and share files easily.
  • Picture Tools: With this tool you can easily perform some basic image operations such as rotate, set as background, slideshows etc. This tool is hidden by default and you'll get to see this only when you click on an image from a folder.
  • File Menu: The new Windows 10 file menu allows users to launch command prompt & windows powershell from within.
  • Search: File Explorer is powered with a search bar that allows you to search items specific to the current folder and it's sub-folders.
  • Custom Navigation: You can customize the left-pane navigation according to your needs using the 'View' tab on top.
  • This PC: It's the new name given to the old 'My Computer' folder.
  • Flat UI: File Explorer is now grazed with flat look just similar to the rest of Windows 10 UI.

Customize Quick Access in File Explorer:

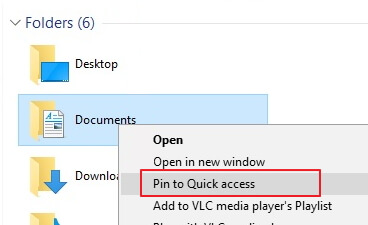
The old Favorite section is replaced by 'Quick Access' which acts like a browser bookmark tool. You can easily customize it to add or remove items/folders of your choice. All you have to do is to choose the folder you want to add, right-click on it and select 'Pin to Quick Access' option.

To remove an item from Quick Access, just right-click on it, and choose 'Unpin from Quick Access' from the context menu.

windows-10-get-help-with-file-explorer-pin-to-quick-access

Upload Files to OneDrive from File Explorer:

OneDrive is fully integrated with File Explorer and you can see the icon on the left-pane of it. Make sure to login to Microsoft account to access this service.

In order to Upload (store) your files or pictures to OneDrive cloud, just drag-and-drop the files from the right-side pane to the directory under OneDrive icon on the left.

Get Help with File Explorer in Windows 10 - Fix

1. F1 Key Not Working Windows 10:

If you are a loyal windows user and used to get help by pressing F1 key, then you may be shocked to find that F1 doesn't work in Windows 10 anymore. So how to get help in Windows 10? Cortana is the answer to you - even better one than the good old F1 help. It is the powerful search feature available in the Start menu and find out the answer to all your queries in flash.

2. File Explorer in Windows 10 Not Responding:

If Windows 10 File Explorer not responding or crashes down often, it's a sign for OS compatibility issue. You have to find and uninstall or fix the software/app responsible to fix the issue.

  1. Download Free CCleaner tool and install it on your Windows 10 machine.
  2. Now open and go to 'Tools' option.
  3. Disable all the Softwares under 'Startup' folder.
  4. Next enable the softwares one by one and look for the signs of not responding or crash down.
  5. This way you can pin-down the app causing the issue. You can uninstall the app altogether or re-install a copy compatible to Windows 10 OS.

That should fix it.

Windows 10 Keyboard Shortcuts for File Explorer:

Finally some cool keyboard shortcuts to make you look geeky. There are plenty of hotkeys available for Windows 10 and here are the most important shortcuts relevant to working with File Explorer in Windows 10.

  • Win logo+E - Open File Explorer
  • Alt+Up Arrow - Move up one folder in the folder tree
  • Alt+Left Arrow - Go back to the previous folder
  • Alt+Right Arrow - Move forward to the next folder
  • Alt+P - Show/Hide Preview pane
  • Alt+Shift+P - Show/Hide Details pane
  • F11 - Maximize/minimize active window
  • Home - Go to the top of the active window
  • End - Go to the bottom of the active window
  • Ctrl+E - Activate the Search box
  • Ctrl+N - Open a new instance of File Explorer
  • Ctrl+W - Close the current File Explorer window
  • Ctrl+Shift+E - Show all folders above selected folder
  • Ctrl+Shift+N - Create new folder inside the current folder
  • Ctrl+Mouse Wheel Up/Down - Increase/decrease icons size and thumbnails

Related: How Do I Sync My Settings In Windows 10

I hope this article guides you to get help with file explorer in windows 10 and fix some of the common issues you face with. To get more tips on Windows 10 check our Windows 10 help section. If you still have any queries please let us know through comments.

How Do I Sync My Settings In Windows 10?

Posted by on 10/28/2016

Wonder How Do I Sync My Settings In Windows 10? Run Windows 10 on multiple PCs/Laptops/tablets you own? Then synchronization is the best way to maintain personalized settings on all your devices. When you turn on sync, Windows 10 will keep track of the settings like theme, bookmarks, saved passwords etc and share them with your other Windows 10 machines.

In case you don't know, here's how to sync settings in Windows 10 operating system.

How to Sync Settings in Windows 10:

In Windows 10, synchronization options are available under 'Sync your settings' and you have to look for it under 'Accounts' settings. And this time Microsoft has done a good job of grouping all those synching choices under seven different options in Windows 10 platform.

But one thing you have to keep in mind, Windows 10 synching is made possible only for authorized devices so you have to login to your Microsoft Account from a specific machine before synching else sync options would be disabled and grayed out.

  1. To sync settings in Windows 10, click on Windows Start button and then on 'Settings'. Now go to 'Accounts' » 'Sync your settings' option.
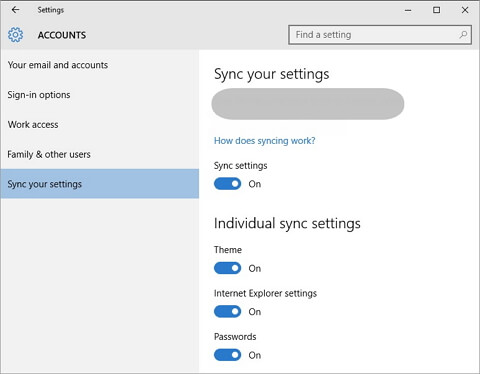
  2. At the top-most you can see 'Sync settings' toggle switch which when turned ON will sync the entire device settings altogether and share them with your other Windows 10 devices under the same account.
  3. sync-settings-in-windows-10
  4. On the other hand you can sync only specific settings and they are grouped under 7 toggle switch options below 'Individual sync settings'.
  5. The first setting is Theme which will sync color, background and other stuffs related to theme of the current Windows 10 machine and you have to turn ON or OFF the switch according to your preference.
  6. The next one is the Internet Explorer settings and turning on this setting syncs all your browser settings like user logins, bookmarks, themes etc with other devices.
  7. And the third option, Password allows you to sync all your stored passwords means the passwords stored on a machine will be available to other devices thus keeping you from re-entering passwords from them.
  8. windows-10-sync-settings
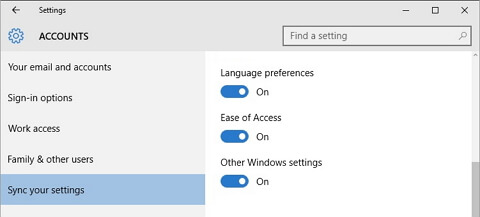
  9. Next is the Language preferences that helps you handle multi-lingual options in Windows 10 easily.
  10. The Ease of Access option is helpful for syncing the accessibility related settings.
  11. And the final Other Windows settings represents all other trivial settings like taskbar position, windows accents, etc and sync those settings if turned ON.

Related: How to Open Internet Explorer in Windows 10

That explains your query how do i sync my settings in Windows 10 and using these tips you can easily sync settings in Windows 10 devices all-at-once or individually. If you have multiple devices like PC/laptop/tablet/mobile running on Windows 10 then syncing all those devices will be really helpful.

How to Open Internet Explorer in Windows 10

Posted by on 10/26/2016

This post will show you how to open internet explorer in Windows 10. Till Windows 10, IE was the default browser of Windows Platform. But things have changed lately and Microsoft introduced its new web browser Edge with Windows 10 and wants user's to get used to it. So it has made Microsoft Edge as the default web browser of Windows 10.

While Internet Explorer is still there it has been stashed deeper into Windows Accessories folder just out of sight. If you are Windows 10 user and crave for the familiarity of classic Internet Explorer, then you can open internet explorer in Windows 10 by using the methods given below.

How to Open Internet Explorer in Windows 10?

Method 1) Open IE via Windows 10 Search Box

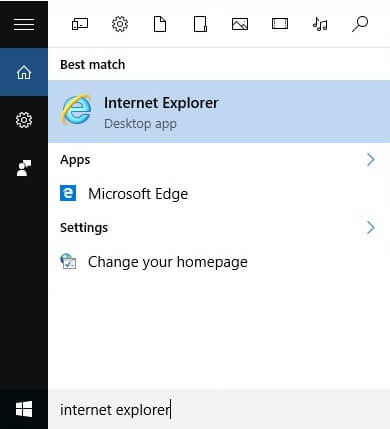
To open internet explorer via Windows 10 search box, click on 'Start' menu and type 'Internet Explorer' in the search bar and hit Enter. This will automatically launch internet explorer. You don't even have to type full name, just enter 'Internet' or 'IE' and Internet Explorer app will appear on the search screen.

open-internet-explorer-in-windows-10-via-search-bar

Method 2) Launch IE from Windows Accessories

As already said, Windows 10 hides Internet Explorer deeper inside Windows Accessories to keep it away from user's direct view. To open IE from Windows Accessories, go to Windows 'Start' button and click on 'Windows Accessories' » 'Internet Explorer' to launch it.

Method 3) Use Run Command

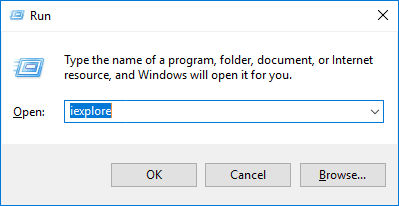
The next method uses handy Run command to open internet explorer. To do so, hit Win logo + R keys and type 'iexplore' in the Run dialogue box and press Enter.

open-internet-explorer-in-windows-10-via-run-command

Method 4) Via Command Prompt

You can also use command prompt to launch internet explorer just like any other windows apps or programs. Open command prompt window and type '@start iexplore' and press Enter to open internet explorer browser. You can also use this method in previous windows versions like Windows 7, Windows 8 or Windows 8.1.

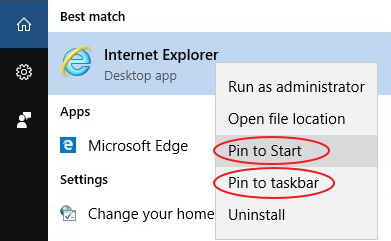
If you find it difficult to use the above methods every time you open internet explorer then you can pin it to start menu or taskbar for easy access.

Pin IE Icon to Windows 10 Start Menu/Taskbar:

To pin internet explorer to start menu or taskbar, type internet explorer on Start menu search bar and right-click on Internet Explorer icon and choose 'Pin to taskbar' or 'Pin to Start' from the context menu.

pin-internet-explorer-icon-to-start-menu-windows-10

Set Internet Explorer as Default Browser in Windows 10:

It's better to set internet explorer as Windows 10 default browser if you use it often.

  1. To set IE as default browser in Windows 10, click on 'Start' button, type 'Settings' in the search box and hit Enter. Or use keyboard shortcut Win logo + I to launch Settings. Once you are in Settings window go to 'System' » 'Default apps'. Under 'Web browser' section choose Internet Explorer as your default browser.
  2. You can also set IE as default browser from the browser itself. Open Internet Explorer, select 'Tools' » 'Internet Options'. Then switch over to 'Programs' tab and click on 'Make Internet Explorer the default browser' link.

Read Also: How to Disable Windows 10 Automatic Updates

That should set internet explorer as your default browser in Windows 10. Just follow any of the above methods to open internet explorer in Windows 10 and use it as per your convenience.

Safari for Windows 10 (DOWNLOAD & INSTALL)

Posted by on 4/18/2016

Download Safari for Windows 10: Safari is one of the incredibly popular desktop browsers similar to Google Chrome, Mozilla Firefox and MS Internet Explorer. Safari is the default web browser for Max OS X just like IE is the default one for Windows 10 and earlier versions. Safari is fast, easy-to-use and comes with loads of attractive features making it undoubtedly the best web browser in the world.

The latest version of safari packs several rich options which allow users to surf and enjoy the internet without hassle. Attractive graphics makes internet browsing a pleasant experience and some of the updated features of Safari is way lot better than Firefox and IE browsers.

download-safari-for-windows-10

How to Disable Windows 10 Automatic Updates

Posted by on 4/07/2016

Disable Windows 10 Automatic Updates: Windows 10 doesn't provide option to turn off/disable windows automatic updates. With earlier versions such as windows 8.1 or windows 7 you can turn off this feature either through Control Panel or Settings.

Microsoft has blown-off this flexibility from Windows 10 which is annoying as hell, as we users like the liberty to choose when to download and install windows updates. Thankfully we got some workaround to turn off or disable Windows Update in Windows 10. Let’s see how to do it.

Download Combofix for Windows 10: A Best Malware Remover

Posted by on 3/31/2016

Combofix is a Powerful Windows 10 Malware Remover. This is an effective cleaning program that scans the computer for known malware, spyware and other junk files and removes them. Combofix comes as a freeware but very good anti-malware when compared to other premium spyware and malware removing tools available in the market. It works by scanning through the computer system thoroughly and display reports containing the possible threats that are automatically removed from the computer.

How to Enable Hibernate Option in Windows 10 PC/Laptops

Posted by on 9/26/2015

Hibernate is a power saving state primarily designed for windows pc or laptops in which it saves the current status and shuts down itself. When you start up the PC again, you get back where you left and all the previously running apps are restored to the state before hibernation. Though Hibernation is not as fast as sleep mode, it consumes less power than sleep. This mode is well suited in case you don't use the laptop or PC for an extended period of time.